Prepare a base for artificial grass installation

Base for artificial grass installations
If you lay synthetic turf on top of an unstable surface it can shift over time and the surface can become uneven. The look and stability of your grass over its lifetime is reliant on a suitably prepared sub base. Installing a fake lawn is a large investment so it’s important that it’s done properly.
Artificial grass is extremely versatile and can be laid on a wide variety of surfaces, from existing lawn area to wooden decking and hard surfaces. So if you’ve been wondering what to put under your artificial grass, below are the most commons bases and application methods.
Need assistance or information? Call 01825 729259 or email us
Aggregate base, concrete edge
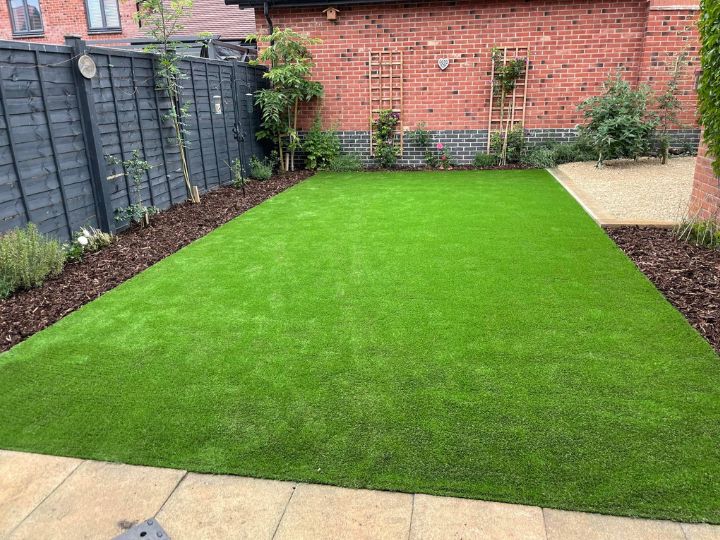
Artificial grass installed on base with concrete edge
An aggregate base is always recommended for garden areas where natural turf is being replaced
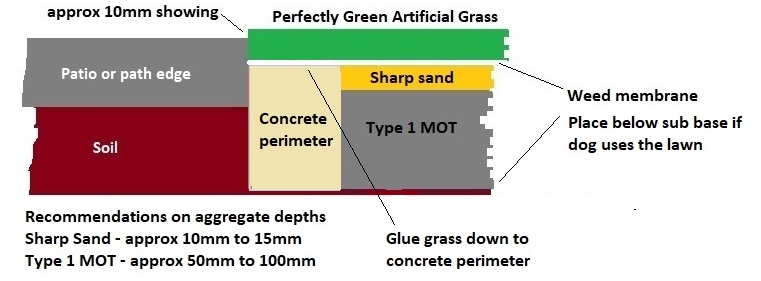
Type 1 MOT and a suitable blinding surface, such as sharp sand or granite dust, provide a stable, porous base which is ideal for artificial grass. Depending on the sub soil and drainage in the area, you should lay 50 to 100mm of Type 1 MOT, thoroughly compacted, and apply a top surface of 10 to 15mm of sharp sand or granite dust
Below is a typical detail when using concrete haunch

Aggregate base, timber or composite edge
Artificial grass fitted on base with timber or composite edge
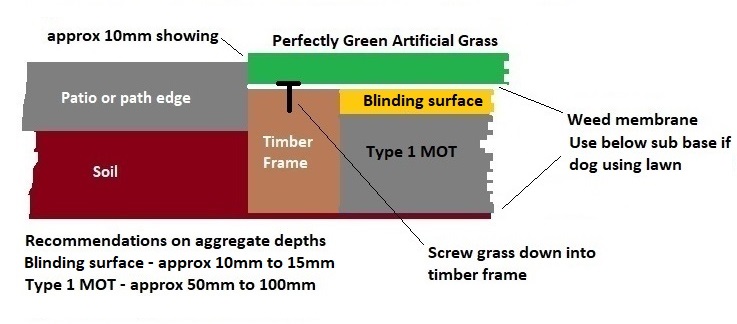
If using a timber edge material be sure to use treated timber to maximise the durability of the material. Composite batten has a longer lifespan than timber but both are suitable for the life expectancy of the artificial lawn which is around 10 to 12 years
Below is a typical detail when using timber or composite batten

Artificial grass fitted on decking
Artificial grass laid on decking
Ensure that the decking is stable, clean, dry and newly treated.
Timber decking can provide a suitable base for synthetic grass but be careful to use a 10mm foam underlay to take up the 'gaps' between the slats, in order to avoid the grass being pushed down into the gaps as you'll see marks appear in the grass over time otherwise! Our
10mm Play Pad will provide a suitable underlay for the grass and also assist with drainage between the grass and the decking. Fix the play pad to the decking by trimming the pad and carefully screwing it down around the perimeter.
Once the decking has been cleaned and prepared, lay out the grass and allow it to settle - this is particularly important in the winter or during colder weather as the backing needs time to flatten completely. Then trim up the grass to suit the area, using a suitable knife, and fix around the edge using screws or glue as preferred.
Artificial grass on hard surfaces

Artificial grass laid on hard surfaces - patios and concrete
Ensure that the area is smooth, dry and clean. Check for any unevenness and smooth out any bumps, as these will be seen through the artificial grass over time. Our
10mm Play Pad is an excellent product to help provide a smoother surface and can be laid and fixed by simply applying a bead of glue around the perimeter of the area and adhering the underlay to it. Leave some gaps in the bead of glue to allow for rain water to drain.
If there is poor drainage, make some holes in the hard surface.
Once the 10mm Play Pad has been installed just trim the synthetic grass to the required shape and size, run a bead of glue around the top surface of the underlay and then apply the grass.
It's that easy.
Artificial grass fitted on balconies

Artificial grass laid on balconies
Ensure balcony surface is stable, clean and dry. Apply 10mm Play Pad to provide cushioning, take up any unevenness and assist with drainage. Glue the underlay down with a bead of glue around the perimeter and fixing the grass to the underlay using the same method.
Using a suitable knife trim up the artificial grass, taking care to create neat and clean edges. Once the roll is trimmed to the correct size and shape just apply a bead of glue to the top of the 10mm play pad, around the perimeter.
Then carefully lay the grass down onto the play pad and press around the edge so that the underside of the grass roll adheres to the glue. Allow a few hours for the glue to set before using the area. It's very simple but if you have any questions just call us on 01825 729259 or email us
Need artificial grass layout and planning assistance?
Supply only of artificial grass or supply and fit?
Recommended artificial grasses and products for installation
SENNA
38mm pile height artificial grass with ‘Micro-nerve’ shaped blades. Approx 28,980 stitches/sqm. Available in 2m and 4m wide rolls.
£27.95 per square metre (ex VAT)
MULSANNE
40mm pile height grass with 'S' shaped blades. Approx 19.950 stitches/sqm. Polyurethne backing. Available in 2m and 4m wide rolls.
£29.95 per square metre (ex VAT)
HURACAN
30mm pile height artificial grass with ‘Wave’ shaped blades. Approx 21,000 stitches/sqm. Available in 2m, 4m and 5m wide rolls.
£14.95 per square metre (ex VAT)
AA-GLUE-310ML
310ml tube of polurethane glue for roll joins and artificial grass fixing
£7.95 excl VAT
RRP £7.95 excl VAT
AM-PG JOINING TAPE
300mm wide joining tape. Please order requiements in linear metres
£1.10 excl VAT
RRP £1.10 excl VAT
AM-PG TERRAM
Perfectly Green Weed Terram. Please order requirements in sqm
£1.20 excl VAT
RRP £1.20 excl VAT
DIABLO
35mm pile height artificial grass with ‘Wave’ shaped blades. Approx 25,2000 stitches/sqm. Available in 2m, 4m and 5m wide rolls.
£19.95 per square metre (ex VAT)
2024 Perfectly Green Product Brochure
High quality artificial grass for:
- Landscaping, homes, gardens, urban, and commercial
- Putting greens, sports, schools, and playgrounds
- Events, exhibitions, and hospitality


